Posts

Week 13: Finishing Touches

Image
We have tested the batteries and they work when we hold the motor cords on it. Today, we are simply soddering the motor wires to the battery so it will stay in place. Then, we will test that it works with the multimeter. After, we will officially present the bicycle generator. This project has really given us a vast amount of new information.

Week 13: Instructable

Image
This is page-by-page layout of our instructable. Click on the picture to enlarge the details. 

Week 13: Done

Image
We are currently attaching the battery to the motor. It seems that the battery charges the motor so we added a diode to reverse the flow and it is now charging the battery. We just have to place some screws to hold it in place and then we are done.

Week 13: Motor On

Image
Last week, we finally were able to mount the motor to the bicycle. We even pedaled on the bicycle to make sure that it worked... it did! We are very happy. All we have left to do now is attach the battery to the motor so when we pedal, we can charge the battery.

Week 12: 3D Printer

Image
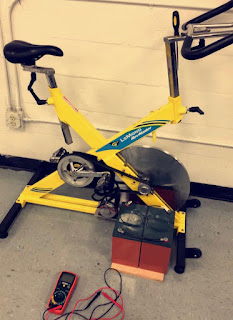
We are using the 3D printer to create a piece that will be attached to the motor. It will fit in between the wheel and, by using friction, will generate the power we need. We tried our first attempt with the printer, but the piece was too tight, so we are making adjustments and will print again.

Week 12: Official Final Plan

Image
We have the 24 volt motor. This will simply be placed in front of the big wheel. The big wheel will spin thus spinning the small part on the motor, generating the power. We will get this done in the three engineering classes we have this week. We are very behind but would like to complete this project perfectly. This will be successful for future classes to use and learn from.